It's been a while since we posted, so we thought we'd do something extra special!
Slipper Sock Tutorial
Each section is made in a different color, so you can better see each step. If you have any questions, please don't hesitate to ask!
Start with some yarn, an 'I' sized crochet hook, and some scissors.
Make a slip knot.
Chain three stitches
make a slip stich into the third stitch from the hook, creating a loop.
Chain 2 (this counts as the first half double crochet)
half double crochet, 11 times, around the circle


form a slip stitch into the first half double crochet, and your circle should have 12 half double crochets. Chain 2.
In this round, you will do two half double crochets in one stich to increase your stitches.
In the following stich, you will only do one, creating an every-other-one pattern.
2-1-2-1-2
at the end of the round, there should be 18 stitches.
slip stitch into the first double crochet of that round, as before, and chain 2. Crochet one half double crochet in each stitch, for two rounds. (18 stiches in each of these rounds)
It will start to look like a little cup

In the next round, you chain two, and half double crochet in the next two stitches. Then you increase in the the 3rd stich.
1-1-2-1-1-2
you should end with 24 stitches in this row
Chain 2, half double crochet in each stitch around the circle
for two rounds (no increasing/24 stiches)
Onto the body of the slipper
Chain two, then half double crochet in the next 14 stitches. Giving you 15 total
Turn when you finish the last stich. Half double crochet each row creating the body.
This is where you can adjust for size, a longer foot would require more rows.
For a size 8 woman's foot, we crocheted 7 more rows, row 10 to 17.

The Heal
chain 2, then half double crochet in each stitch, you should still have 15 stiches in this row.
chain 2, half double crochet in the first 2 stitchs. Then, half double crochet two together, then, half double crochet in the next stich, repeat this pattern three more times, then half double crochet in the last 3 stiches. you should end with 12 stiches in this row
chain 2, half double 2 together, half double the next, repeat 3 more times, ending with 8 stitches in this row.
slip stich into the first stitch of the round....
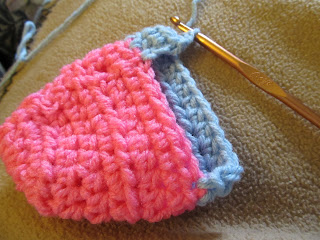
...closing the heal like this. Cut a long tail (5+ inches)
we didn't necessarily like the opening in the heal, so we used our tail to stich it shut like this.
Now you have a basic slipper. YAY!!!
Celebrate, but don't loose that hook. We aren't done yet!!!
Pick whether the slipper will be for the left foot or the right.
We are starting with the LEFT foot.
Starting on the RIGHT side of the slipper, where the toe meets the body chain two, and continue to half double crochet in every stitch around the opening.
slip stich into the first chain you started with, to close the round.
This is why it is important to know if you are working on the right slipper, or the left.
Chain one, and single crochet 4 stitches, then single crochet two stiches to decrease. Then single crochet 3 stiches.
Then CHAIN 17.
at the end of your 17th stich, half double crochet in the 3rd stich from the hook.
Chain 1, skip one stitch, then half double crochet in each chain, until you reach the other end
When you reach where you left off, single crochet on the slipper edge, where you left off.
single crochet 4 stitches, then crochet 2 together as the decrease. Repeate that until you get to the end.
slip stitch into the first single crochet, leaving a 5 inch tail to weave in ends.
add a button to the outside edge where the strap can fasten
feel free to embelish with rhinestones, seed beads, sequins, crocheted flowers, or felt appliques.
don't forget to start on the opposite side for edging for the other foot.
*a quick girl scout tip... if you use puffy paints, to put dots or lines on the bottoms of the slipper, and let it dry 24 hours, you will have non-slip grippies on the bottoms.
ENJOY!!!


1 comment:
Very nice and in depth! I think I might actually try it. :p
Post a Comment