I apologize for the fact that not only are my topics random bit so are the times when I blog. Trying to make it a priority has been difficult. But I just need to make it a habit.
In unrelated news! Jessie (the other half of our team) is going to medical school!!! Woohoo! Don't worry. We will still be here to provide quirky knits and craftiness. We are even putting in an application for artist alley at otakon again. I really hope we get picked out of the hat!
I would like to know what you want to read about. I will make it happen! Would you like to see a tutorial? Or a review? Comment below to let me know!
Showing posts with label tutorial. Show all posts
Showing posts with label tutorial. Show all posts
Tuesday, March 26, 2013


Friday, October 12, 2012
Bubblegum Wrappers and Duct Tape
Do you ever wonder what Bubblegum Wrappers and Duck Brand Duct tape have in common?
Well, the answer is that you can use them both to make bracelets and other crafts!
I'm sure by now you have seen the chains made of bubble gum wrappers that are used to make bags, bracelets, chains and more!
 |
| SHORT bubblegum chain |
Funny Memory: When I was younger, I remember hoarding all my gum wrappers under my bed to make long chais to go all the way around my room. I even remember standing in line at the Rite Aid digging for extra change to get those last few gum packs because I just HAD to make my chain a few feet longer to beat my friend's chain!
It has been harder and harder to find those gum wrappers, so people have been creative by using starburst wrappers and even chip bag wrappers to do the same thing.
 |
| Figure 1 |
In fact, a few weeks ago, my Girl Scout Troop did a craft where we recycled old magazines to make bracelets in the same method.
Once you get the hang of the methodical filding of each wrapper, the rest of the project is a piece of cake!
So, I was sitting here thinking....if we can resort to using chip bags, why not DUCT TAPE!
DIY: Duct Tape Chain Bracelet
 |
| Finished Product :) |
- Various Colors of duct tape, we used 6 colors (or one color, if you dislike the rainbow look)
- sissors or Xacto Knife
- Cutting surface
- Ruler
- Tiny magnets or some velcro
1. Cut 6 different strips of Duck® tape, one strip of each color - each measuring about 9 inches in length.
2. Cut each strip in half. Now they measure about 4.5 inches in length. You should have 12 strips
3. Cut each 4.5-inch strip in half lengthwise. You should have 24 strips
4. Fold each strip in half length-wise, sticky side together. This is the perfect dimmension for the bracelet!
5. Making a link: fold one stip in half & crease. Open the fold. Fold each end towards the middle crease. Fold in half again (FIG.1). Repeat.
6. To join the links, insert the ends of one link in the folds of the other link (FIG. 1).
7. Continue making the links and joining them to the previous link until the bracelet measures the length you need it for your wrist. Make it overlap a bit for the closure by adding ONE more link now.
8. Apply the magnets or velcro to the last and first link to make the closure
Your finished product should resemble the one pictured above.
Hope you enjoyed this DIY project and spend some time reconnecting to a fav childhood pasttime. Ohh, and don't forget to post a pic of the finished project, if you try....or really any other duct tape creation...I would love to see them!
Thanks for stopping by....
Monday, July 30, 2012
Crochet Slipper Sock Tutorial
It's been a while since we posted, so we thought we'd do something extra special!
Slipper Sock Tutorial
Each section is made in a different color, so you can better see each step. If you have any questions, please don't hesitate to ask!

Start with some yarn, an 'I' sized crochet hook, and some scissors.

Make a slip knot.


Chain three stitches

make a slip stich into the third stitch from the hook, creating a loop.

Chain 2 (this counts as the first half double crochet)

half double crochet, 11 times, around the circle


form a slip stitch into the first half double crochet, and your circle should have 12 half double crochets. Chain 2.


In this round, you will do two half double crochets in one stich to increase your stitches.
In the following stich, you will only do one, creating an every-other-one pattern.
2-1-2-1-2
at the end of the round, there should be 18 stitches.

slip stitch into the first double crochet of that round, as before, and chain 2. Crochet one half double crochet in each stitch, for two rounds. (18 stiches in each of these rounds)
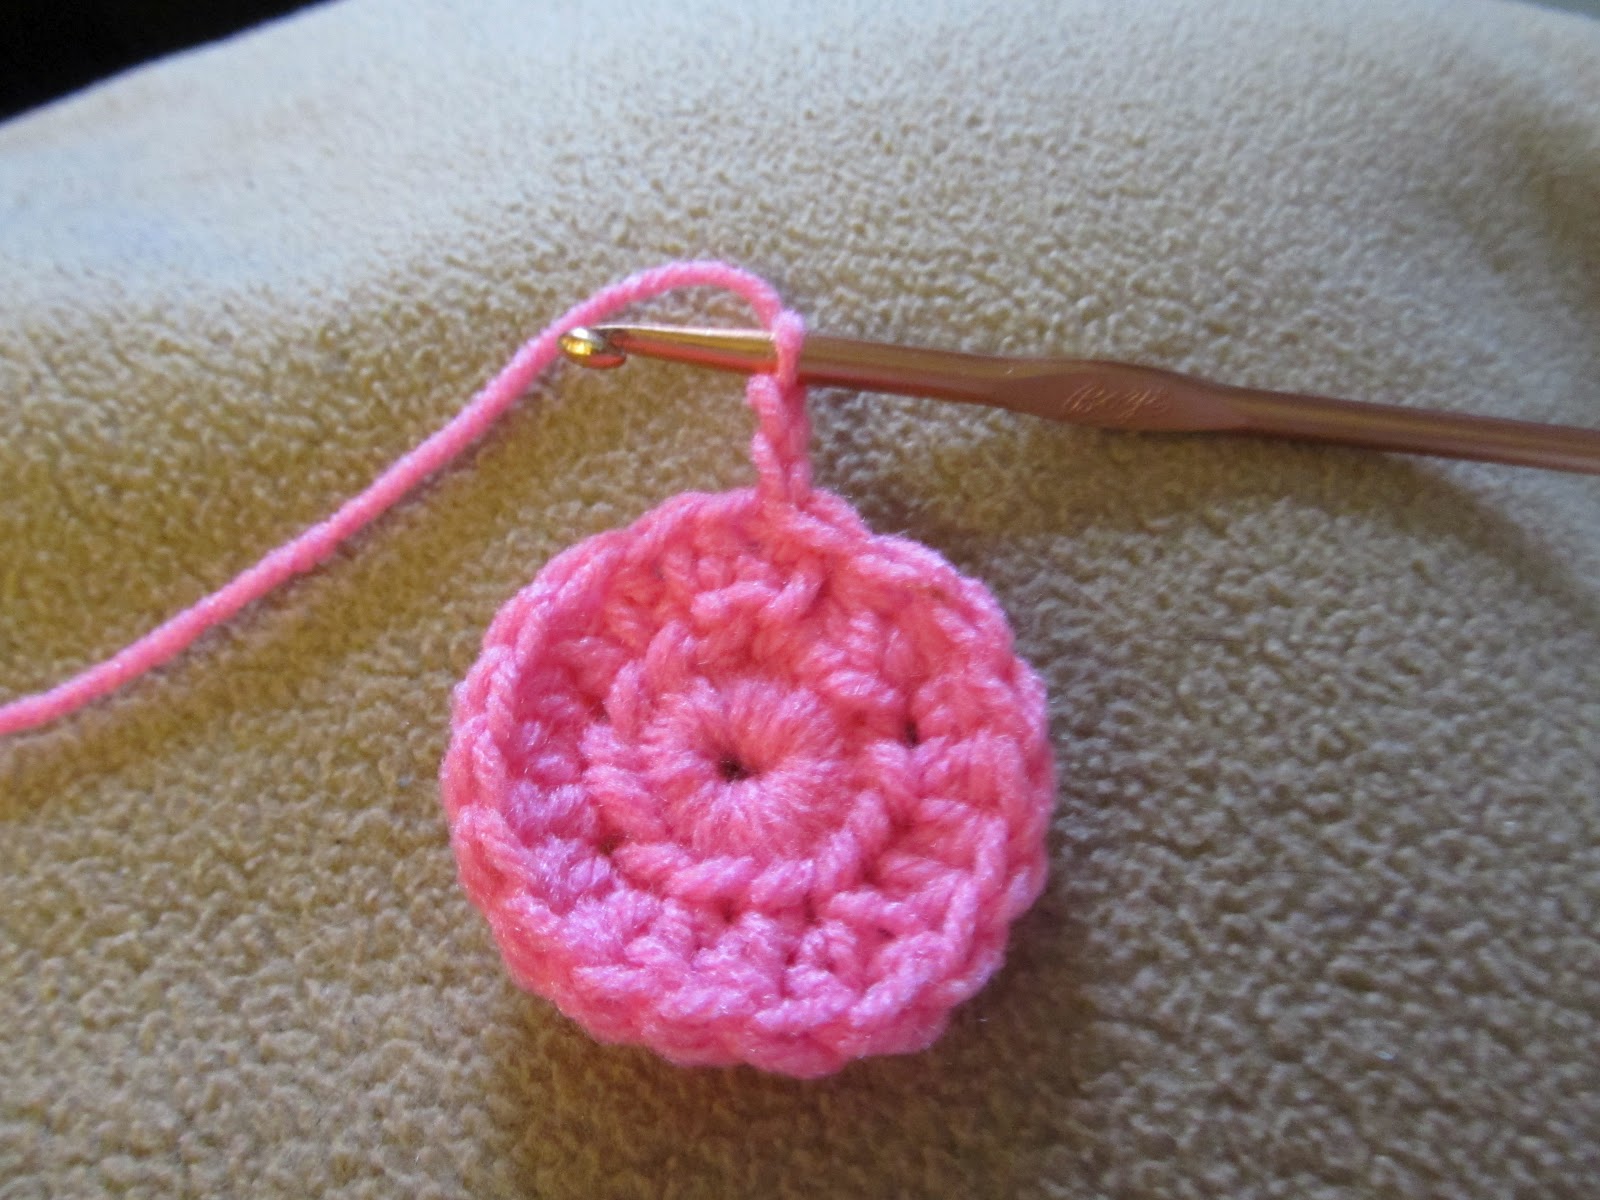
It will start to look like a little cup

In the next round, you chain two, and half double crochet in the next two stitches. Then you increase in the the 3rd stich.
1-1-2-1-1-2
you should end with 24 stitches in this row

Chain 2, half double crochet in each stitch around the circle
for two rounds (no increasing/24 stiches)

Onto the body of the slipper
Chain two, then half double crochet in the next 14 stitches. Giving you 15 total


Turn when you finish the last stich. Half double crochet each row creating the body.
This is where you can adjust for size, a longer foot would require more rows.
For a size 8 woman's foot, we crocheted 7 more rows, row 10 to 17.

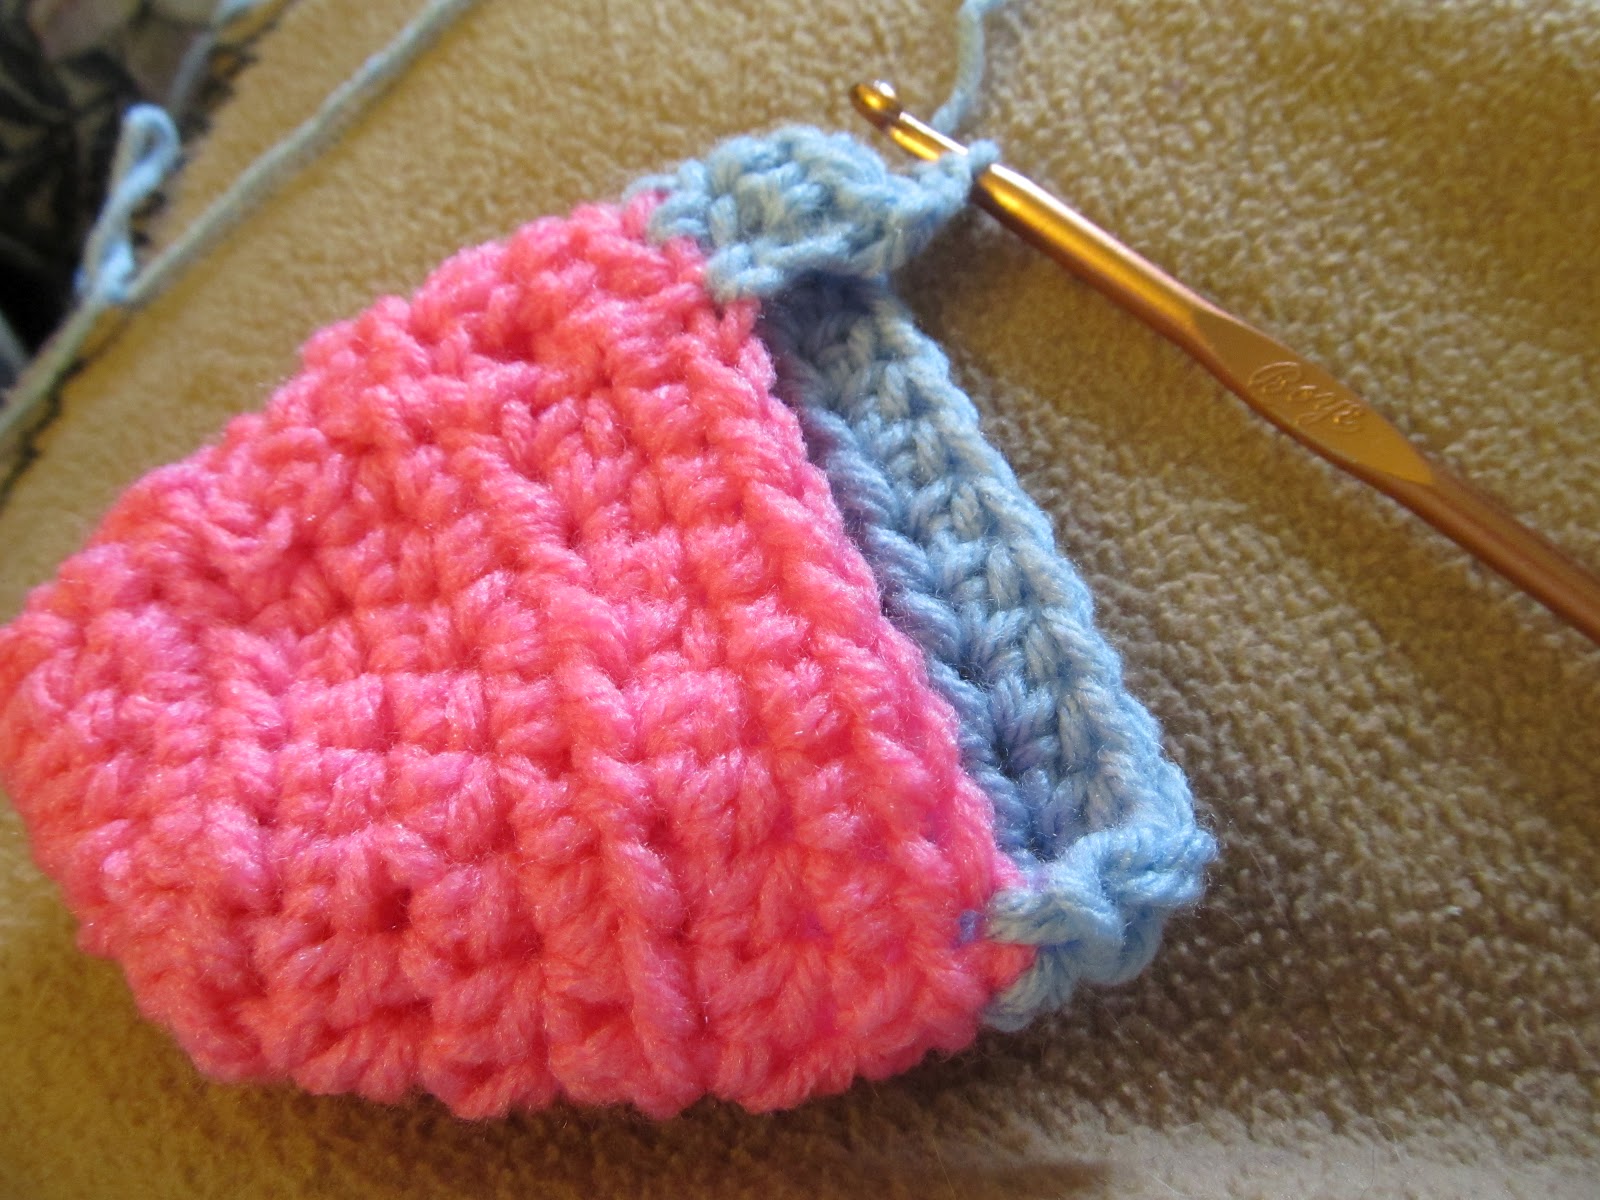

The Heal
chain 2, then half double crochet in each stitch, you should still have 15 stiches in this row.


chain 2, half double crochet in the first 2 stitchs. Then, half double crochet two together, then, half double crochet in the next stich, repeat this pattern three more times, then half double crochet in the last 3 stiches. you should end with 12 stiches in this row


chain 2, half double 2 together, half double the next, repeat 3 more times, ending with 8 stitches in this row.

slip stich into the first stitch of the round....

...closing the heal like this. Cut a long tail (5+ inches)

we didn't necessarily like the opening in the heal, so we used our tail to stich it shut like this.

Now you have a basic slipper. YAY!!!
Celebrate, but don't loose that hook. We aren't done yet!!!

Pick whether the slipper will be for the left foot or the right.
We are starting with the LEFT foot.
Starting on the RIGHT side of the slipper, where the toe meets the body chain two, and continue to half double crochet in every stitch around the opening.


slip stich into the first chain you started with, to close the round.

This is why it is important to know if you are working on the right slipper, or the left.
Chain one, and single crochet 4 stitches, then single crochet two stiches to decrease. Then single crochet 3 stiches.

Then CHAIN 17.

at the end of your 17th stich, half double crochet in the 3rd stich from the hook.

Chain 1, skip one stitch, then half double crochet in each chain, until you reach the other end

When you reach where you left off, single crochet on the slipper edge, where you left off.


single crochet 4 stitches, then crochet 2 together as the decrease. Repeate that until you get to the end.


slip stitch into the first single crochet, leaving a 5 inch tail to weave in ends.

add a button to the outside edge where the strap can fasten

feel free to embelish with rhinestones, seed beads, sequins, crocheted flowers, or felt appliques.

don't forget to start on the opposite side for edging for the other foot.
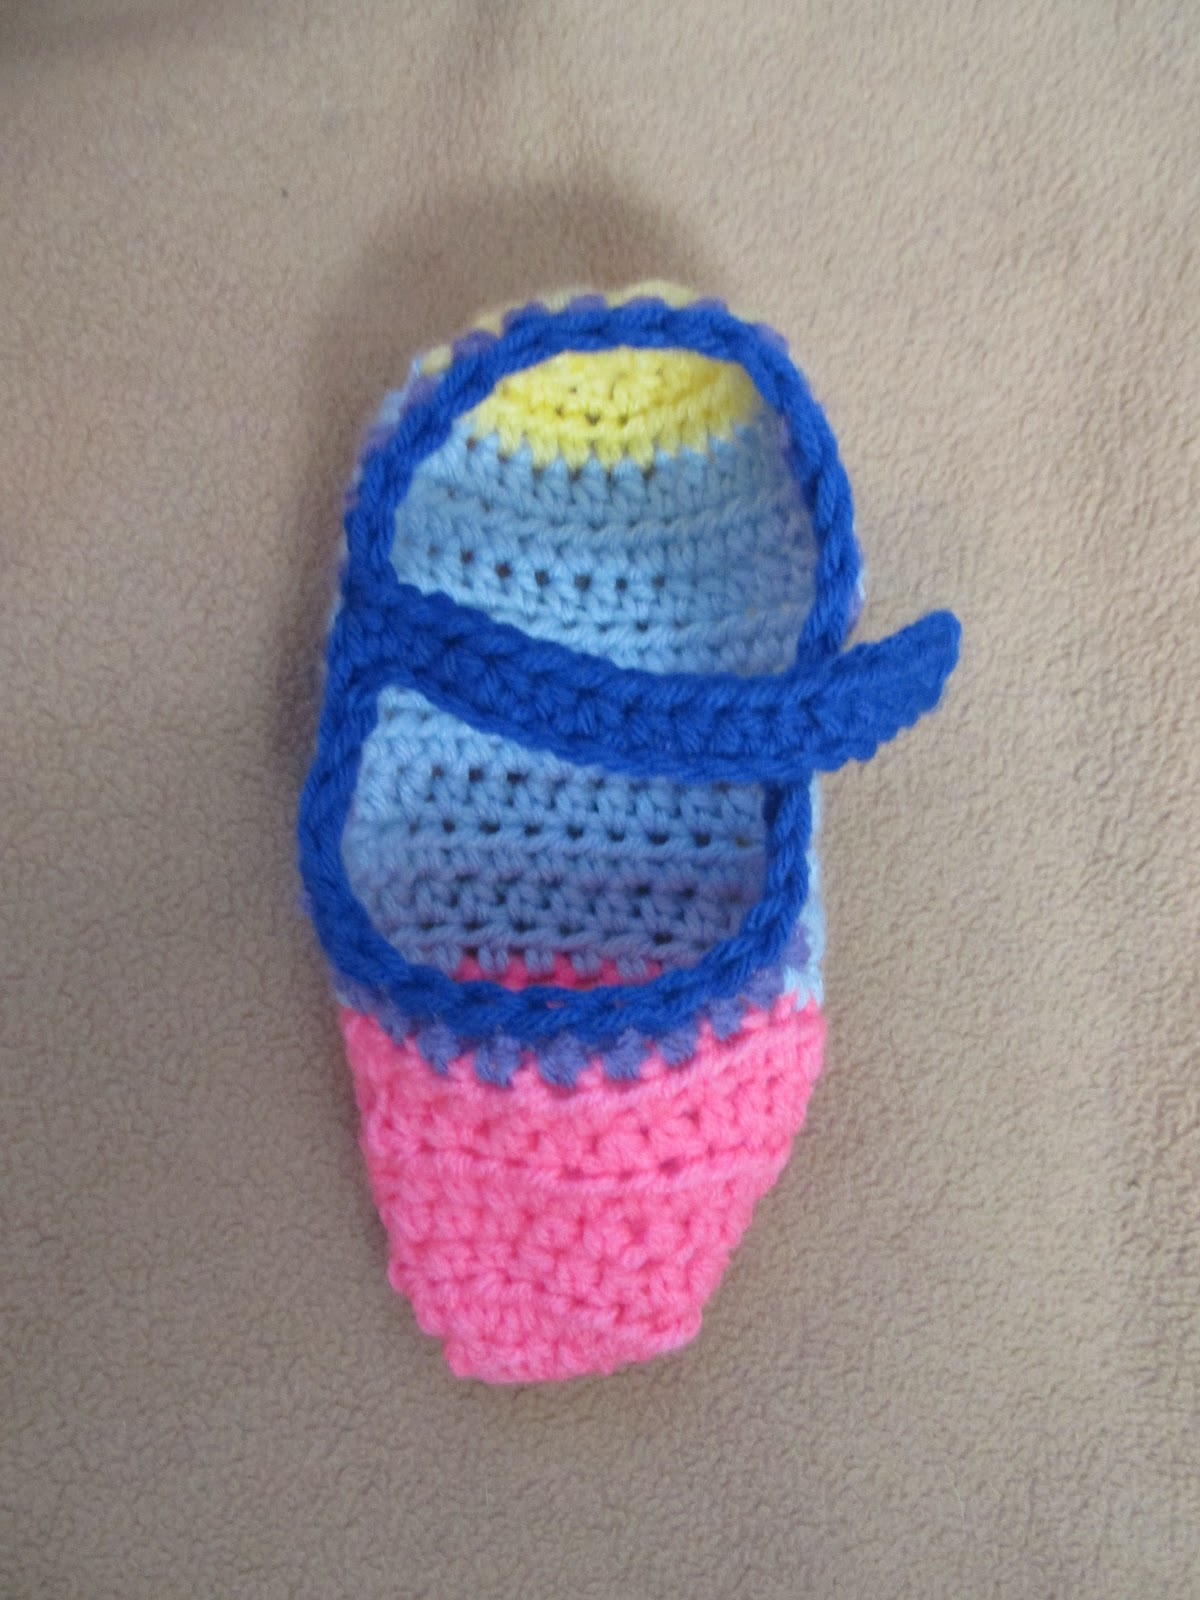
*a quick girl scout tip... if you use puffy paints, to put dots or lines on the bottoms of the slipper, and let it dry 24 hours, you will have non-slip grippies on the bottoms.
ENJOY!!!
Subscribe to:
Posts (Atom)