Short answer? Anywhere.
Here is a list of where you can follow us if you are a fan. Some are used more than others, but don't dismiss something that looks like it hasn't been used in a while, new things are comming.
We don't want to bombard you, but we do want to communicate with you, where you are. So if we missed your favorite social media outlet, let us know, we may just live in a bubble and not know about it, or as an oversite, forgot to link it.
in most cases we can be searched for under jessie and jessjess creations OR jessjess385201.
I'll start with our blog. HEY GUESS WHAT!!! you can find us right here. And we thank so so much for stopping by. This is a little more of a candid look into our lives and opinions on things. I am told no one reads blogs anymore, i think maybe they are wrong.
We have a youtube account, right now it has 1 upload, of my hedgie playing. There are no subscribers but we are putting together some videos now and want to use it. I love youtube. I watch it all the time, i like it better than tv.
I am most definately on pinterest. i love it. I use it at work, I have a board with things from my shop, please check them out, and please visit my shop and pin other things as well. This morning i moved my pinterest from being personal, to from my shop. Basically my name changed, but we do alot with scouts and camping, always fun to see what people do in their 'real' lives.
We are on facebook. Here we try to keep the most up to date info on our shop. Whats going on, whats new, whats promoted. I wish people would be a little more involved on here. Visit us, comment, share, add fan photos, i'm on here almost daily, and get every notification instantly thanks to my ipad. Its easy for me to use this app at work, so it's a really easy way to contact us, and share ideas and awesomeness. And i don't constantly post 30 times a day stuff to buy from me like some fan pages do.
Shoot us a tweet once in a while, I love that theres limited characters. it forces people to pick their words carefully, and i dont have to read through rambles such as this blog post right here
Thursday, November 15, 2012
Tuesday, November 13, 2012
New Path, New Style
So this blog started out as a personal blog of mine, it has morphed into a combined blog of both Jess Jess AND Jessie, and is used in combination with our shop. I apologize if you don't like that. When you run a business from your home, no matter how small, it doesn't feel like just a hobby. With the internet you are your own advertising, your own maintanance, your own blogger, tweeter, facebooker, uplister, photographer, editer. Being creative and creating stock to actually sell is the easy part and one that sometimes takes a back seat. I have so many things i need to check a day that instead of running a seperate blog for our shop, I don't see a need for that. I am one person, well two since both of us now occasionally blog. But I can't keep up with multiple blogs along with everything else. I mean, this isn't our primary income. I'd say it's not a full time job but it is. I also updated our information, so feel free to check that out if you want to learn anything about us.
I'm also going to post a blog with all the places you can find us on the internet. so stay tuned for that!
You will notice (probably not) a new link on the right, from julep maven. Currently I have a subscription and if you click on that, it will give you my referal code to join. If you have a nail polish addiction like me, check it out.
I had a minor interuption from typing and now i forget where i was going with this!
 So Christmas is comming up, we made a few nativities that are for sale in our shop. Let us know if you are interested. We would love some feedback on them, good or bad. They are made 100% from polymer clay. We are also looking into plans for our next little scene. Suggesions?
oh! to my few readers, I'd like to ask a favor of you. Please click on that little comment box down there, and comment with a topic, or a question for future blogging. I would love to have a bit more interaction with you guys, so please feel free to post suggestions or questions and i'll get back to you on those topics!
I'm also going to post a blog with all the places you can find us on the internet. so stay tuned for that!
You will notice (probably not) a new link on the right, from julep maven. Currently I have a subscription and if you click on that, it will give you my referal code to join. If you have a nail polish addiction like me, check it out.
I had a minor interuption from typing and now i forget where i was going with this!

oh! to my few readers, I'd like to ask a favor of you. Please click on that little comment box down there, and comment with a topic, or a question for future blogging. I would love to have a bit more interaction with you guys, so please feel free to post suggestions or questions and i'll get back to you on those topics!
Monday, October 15, 2012
Halloween Treats in England
Halloween Celebration differ by Culture

Candy Corn, Witches, Ghost & Goblins....That's all part of Halloween in the U.S.
But did you know that....
Halloween is celebrated in many different countries, on several different days and it's celebrated with
different types of foods.
November 1: All Saints' Day in England
In many old English towns, children go "souling" on All Souls' Eve! They go from door to door singing for cakes, and sing:
Soul! soul! for a soul-cake!
I pray, good misses a soul-cake--
An apple or pear, a plum or a cherry,
Any good thing to make us merry,
One for Peter, two for Paul,
Three for Him who made us all.
Looking for something creative to try THIS Halloween Season? Try this recipe for Soul Cakes
Soul Cakes
Soul cakes get stale within a day or two, so eat 'em while they're hot.
Makes 12 to 15 2-inch soul cakes
Ingredients:
Ingredients:
1 yeast pkg. 2 cups milk
1/2 cup sugar 6 cups flour
1/4 cup warm water 1 teaspoon salt
1/4 lb. butter 3 teaspoons cinnamon
Pinch Saffron Raisins/ Currents to taste
Dissolve the yeast with 1 teaspoon of sugar in the lukewarm water and let
it stand in a warm place. Cream the butter with the sugar. Add the milk which has been scalded and slightly cooled and then add the yeast. Sift the flour with the salt, cinnamon, saffron and add to the mixture, kneading for a few minutes. Place in a bowl and allow it to rise in a warm place to double its bulk. Shape the dough into round buns and bake at 375 degrees F. for about thirty minutes or until lightly browned. Originally, these cakes were shaped like men and women and were given raisins or currants for eyes.

Friday, October 12, 2012
Bubblegum Wrappers and Duct Tape
Do you ever wonder what Bubblegum Wrappers and Duck Brand Duct tape have in common?
Well, the answer is that you can use them both to make bracelets and other crafts!
I'm sure by now you have seen the chains made of bubble gum wrappers that are used to make bags, bracelets, chains and more!
 |
| SHORT bubblegum chain |
Funny Memory: When I was younger, I remember hoarding all my gum wrappers under my bed to make long chais to go all the way around my room. I even remember standing in line at the Rite Aid digging for extra change to get those last few gum packs because I just HAD to make my chain a few feet longer to beat my friend's chain!
It has been harder and harder to find those gum wrappers, so people have been creative by using starburst wrappers and even chip bag wrappers to do the same thing.
 |
| Figure 1 |
In fact, a few weeks ago, my Girl Scout Troop did a craft where we recycled old magazines to make bracelets in the same method.
Once you get the hang of the methodical filding of each wrapper, the rest of the project is a piece of cake!
So, I was sitting here thinking....if we can resort to using chip bags, why not DUCT TAPE!
DIY: Duct Tape Chain Bracelet
 |
| Finished Product :) |
- Various Colors of duct tape, we used 6 colors (or one color, if you dislike the rainbow look)
- sissors or Xacto Knife
- Cutting surface
- Ruler
- Tiny magnets or some velcro
1. Cut 6 different strips of Duck® tape, one strip of each color - each measuring about 9 inches in length.
2. Cut each strip in half. Now they measure about 4.5 inches in length. You should have 12 strips
3. Cut each 4.5-inch strip in half lengthwise. You should have 24 strips
4. Fold each strip in half length-wise, sticky side together. This is the perfect dimmension for the bracelet!
5. Making a link: fold one stip in half & crease. Open the fold. Fold each end towards the middle crease. Fold in half again (FIG.1). Repeat.
6. To join the links, insert the ends of one link in the folds of the other link (FIG. 1).
7. Continue making the links and joining them to the previous link until the bracelet measures the length you need it for your wrist. Make it overlap a bit for the closure by adding ONE more link now.
8. Apply the magnets or velcro to the last and first link to make the closure
Your finished product should resemble the one pictured above.
Hope you enjoyed this DIY project and spend some time reconnecting to a fav childhood pasttime. Ohh, and don't forget to post a pic of the finished project, if you try....or really any other duct tape creation...I would love to see them!
Thanks for stopping by....
Wednesday, October 10, 2012
October Holidays, Not Just Halloween!
Ever consider celebrating holidays OTHER than the ones we hold dear to our hearts? Well, then you should know that October isn't just about Halloween anymore!
 Here are some things you might want to try today to honor this awesome holiday....
1) Invite some friends over tonight for a cupcake-decorating competition
2) Practice your icing "technique" by making a yummy dessert
3) Try out a new cake recipe or Frosting recipe
4) Create a truly one-of-a-kind dessert recipe that you can share with others! (you can even post it here for us to see)
Even though cake decorating is an art form that requires patience and experience, you can still give it your best try. What could be more fun or yummy than celebrating cake? Let the delicousness begin!
TIP: Let your cake cool completly BEFORE your icing it. Otherwise, you will have a mess on your hands.
October 10th, 2012 is National Cake Decorating Day!

1) Invite some friends over tonight for a cupcake-decorating competition
2) Practice your icing "technique" by making a yummy dessert
3) Try out a new cake recipe or Frosting recipe
4) Create a truly one-of-a-kind dessert recipe that you can share with others! (you can even post it here for us to see)
Even though cake decorating is an art form that requires patience and experience, you can still give it your best try. What could be more fun or yummy than celebrating cake? Let the delicousness begin!
TIP: Let your cake cool completly BEFORE your icing it. Otherwise, you will have a mess on your hands.
Wednesday, October 3, 2012
October Giveaway!

***CLOSED: Congrats to our winner, Matt! ***
Welcome to the October giveaway! Each month we want to give away an Etsy treasure to one lucky blog reader.
This month we're giving away a set of buttons made by JessieandJessJessCreations. This button set is inspired by the popular Harry Potter book series. The set includes 5 buttons reading:
' I Solemnly swear that I am up to no good'
'mischief managed'
' I walked through my closet door, and found myself in the room of requirements wishing for the one ring to rule them all'
'area 51 is the muggles department of mysteries'
and the deathly hallows symbol
This accessory is perfect to display your unique personality because you can pin the buttons to your shirt, shoes, bookbag, purse & more!
If you want to win this button set , all you need to do is visit JessieandJessJessCreations Etsy Shop, and then come back to the blog and leave a comment telling us what item in our shop is your FAVORITE. If you tweet, Facebook, blog or post on any other social media about the giveaway, you can leave additional comments saying you have done so. Every comment on this blog entry counts as one entry into the drawing.
So Hurry over to Jessie and JessJess Creations Etsy Shop and choose your FAVORITES!
Good Luck :)
The Rules
- Anyone can enter, from anywhere in the world
- Every comment on this blog entry counts as ONE entry into the drawing. However, any comment which is not an entry as described above will be removed.
- The giveaway ends at noon EST on Monday October 15th.
- One winner will be picked using a random number generator and announced byTuesday October 16th.
- Please make sure that we can contact you in some way from your comment.
- The prize is the "Harry Potter Button Set" made by JessieandJessJessCreations shown in the photo above, it will be shipped to the winner by USPS
Saturday, August 18, 2012
AUGUST GiVeAwAy!!!

UPDATE: A Winner has been selected using the radom number generator, so congrats to OUR WINNER DAMLA!
Welcome to the August giveaway! Each month we want to give away an Etsy treasure to one lucky blog reader.
This month we're giving away a trendy and colorful pair of cupcake earrings made by JessieandJessJessCreations. These earrings are made of polymer clay that is sealed with a high shine gloss. They are inspired by Disney's Princess, Ariel, in the "the little mermaid"! This accessory is perfect for the last few days of summer, or a great back-to-school gift or even a cute christmas gift for the early bird shopper!
If you want to win this pair of earrings all you need to do is visit Jessie and JessJess Creations Facebook Page and LIKE it, then come back to the blog and leave a comment saying you did so. If you tweet, Facebook, blog or post on any other social media about the giveaway, you can leave additional comments saying you have done so. Every comment on this blog entry counts as one entry into the drawing.
So Hurry over to Jessie and JessJess Creations Facebook Page and LIKE it!
Good Luck :)
The Rules
- Anyone can enter, from anywhere in the world
- Every comment on this blog entry counts as ONE entry into the drawing. However, any comment which is not an entry as described above will be removed.
- The giveaway ends at noon EST on Friday August 31th.
- One winner will be picked using a random number generator and announced by Saturday Sept 1st.
- Please make sure that we can contact you in some way from your comment.
- The prize is the "little Mermaid" polymer clay Earrings made by JessieandJessJessCreations shown in the photo above, it will be shipped to the winner by USPS
Tuesday, August 7, 2012
Troubled Tuesday
Check out this new banner!

PS, this little guy was very cooperative during our little photoshoot.

Monday, July 30, 2012
Crochet Slipper Sock Tutorial
It's been a while since we posted, so we thought we'd do something extra special!
Slipper Sock Tutorial
Each section is made in a different color, so you can better see each step. If you have any questions, please don't hesitate to ask!

Start with some yarn, an 'I' sized crochet hook, and some scissors.

Make a slip knot.


Chain three stitches

make a slip stich into the third stitch from the hook, creating a loop.

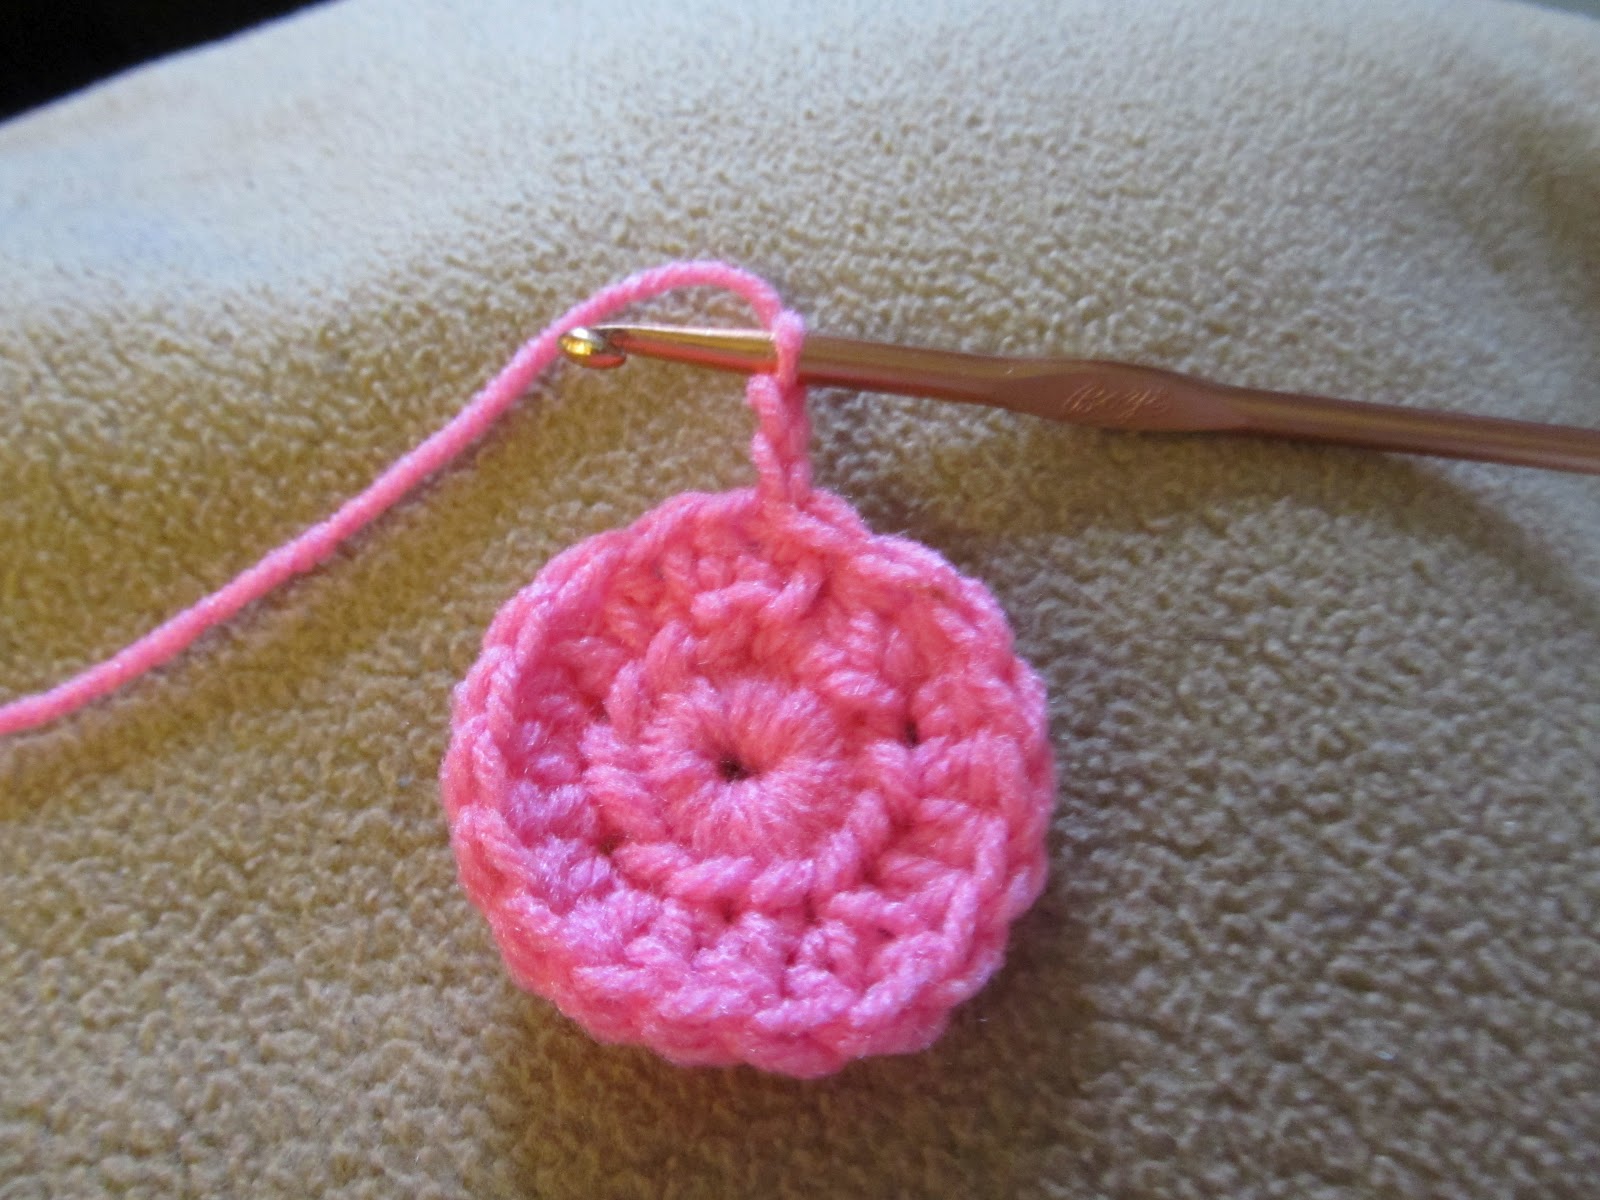
Chain 2 (this counts as the first half double crochet)

half double crochet, 11 times, around the circle


form a slip stitch into the first half double crochet, and your circle should have 12 half double crochets. Chain 2.


In this round, you will do two half double crochets in one stich to increase your stitches.
In the following stich, you will only do one, creating an every-other-one pattern.
2-1-2-1-2
at the end of the round, there should be 18 stitches.

slip stitch into the first double crochet of that round, as before, and chain 2. Crochet one half double crochet in each stitch, for two rounds. (18 stiches in each of these rounds)
It will start to look like a little cup

In the next round, you chain two, and half double crochet in the next two stitches. Then you increase in the the 3rd stich.
1-1-2-1-1-2
you should end with 24 stitches in this row

Chain 2, half double crochet in each stitch around the circle
for two rounds (no increasing/24 stiches)

Onto the body of the slipper
Chain two, then half double crochet in the next 14 stitches. Giving you 15 total


Turn when you finish the last stich. Half double crochet each row creating the body.
This is where you can adjust for size, a longer foot would require more rows.
For a size 8 woman's foot, we crocheted 7 more rows, row 10 to 17.

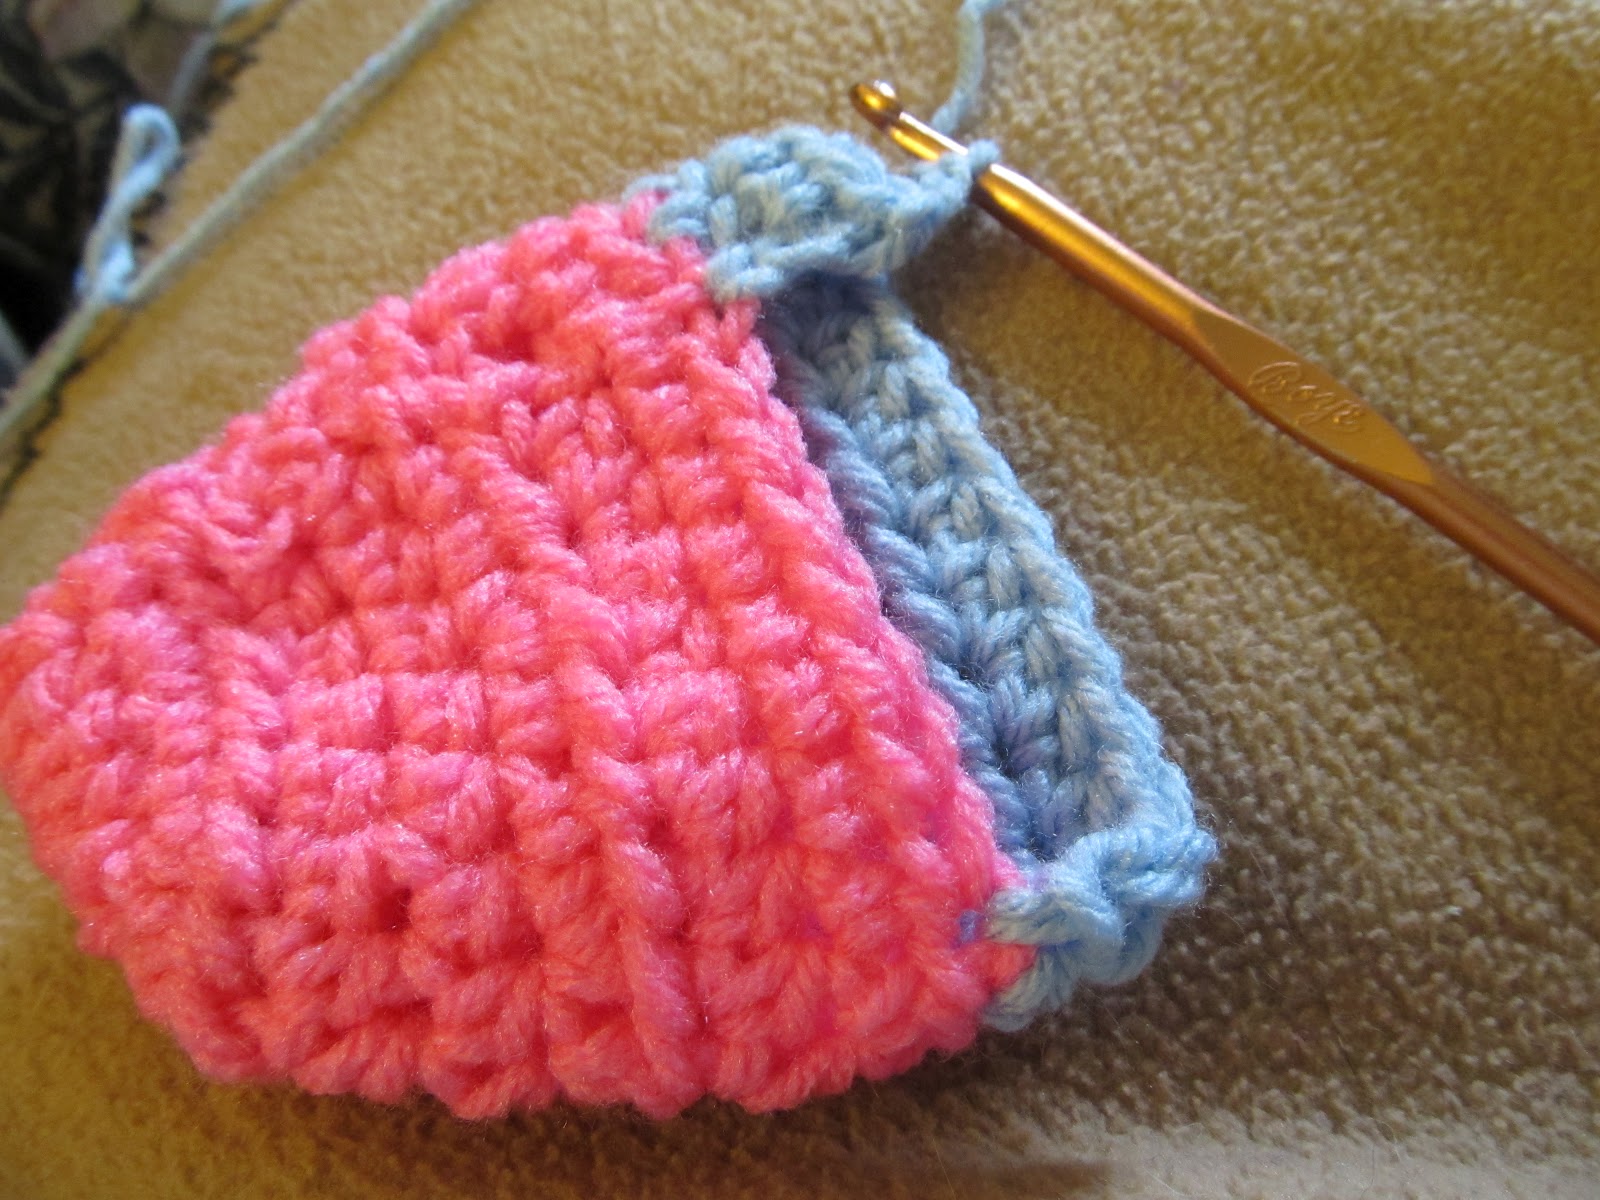

The Heal
chain 2, then half double crochet in each stitch, you should still have 15 stiches in this row.


chain 2, half double crochet in the first 2 stitchs. Then, half double crochet two together, then, half double crochet in the next stich, repeat this pattern three more times, then half double crochet in the last 3 stiches. you should end with 12 stiches in this row


chain 2, half double 2 together, half double the next, repeat 3 more times, ending with 8 stitches in this row.

slip stich into the first stitch of the round....

...closing the heal like this. Cut a long tail (5+ inches)

we didn't necessarily like the opening in the heal, so we used our tail to stich it shut like this.

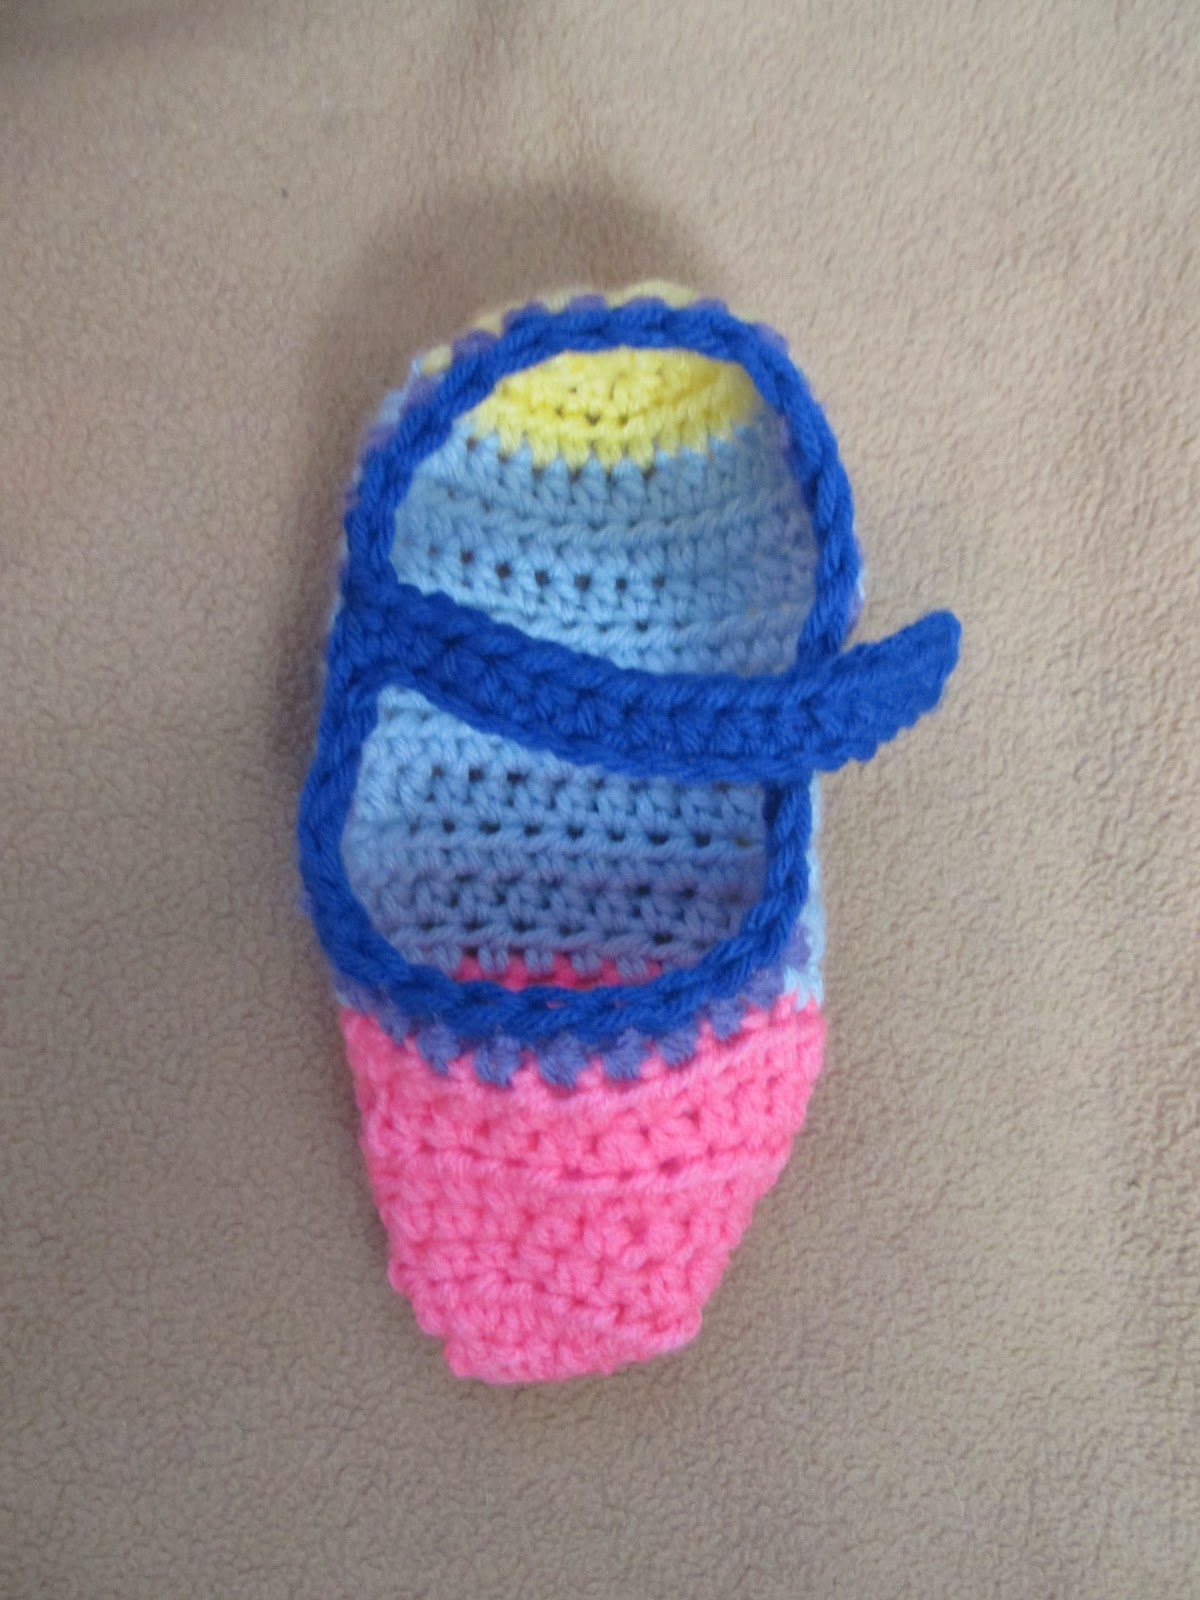
Now you have a basic slipper. YAY!!!
Celebrate, but don't loose that hook. We aren't done yet!!!

Pick whether the slipper will be for the left foot or the right.
We are starting with the LEFT foot.
Starting on the RIGHT side of the slipper, where the toe meets the body chain two, and continue to half double crochet in every stitch around the opening.


slip stich into the first chain you started with, to close the round.

This is why it is important to know if you are working on the right slipper, or the left.
Chain one, and single crochet 4 stitches, then single crochet two stiches to decrease. Then single crochet 3 stiches.

Then CHAIN 17.

at the end of your 17th stich, half double crochet in the 3rd stich from the hook.

Chain 1, skip one stitch, then half double crochet in each chain, until you reach the other end

When you reach where you left off, single crochet on the slipper edge, where you left off.


single crochet 4 stitches, then crochet 2 together as the decrease. Repeate that until you get to the end.


slip stitch into the first single crochet, leaving a 5 inch tail to weave in ends.

add a button to the outside edge where the strap can fasten

feel free to embelish with rhinestones, seed beads, sequins, crocheted flowers, or felt appliques.

don't forget to start on the opposite side for edging for the other foot.
*a quick girl scout tip... if you use puffy paints, to put dots or lines on the bottoms of the slipper, and let it dry 24 hours, you will have non-slip grippies on the bottoms.
ENJOY!!!
Subscribe to:
Posts (Atom)